I’ve searched the postings here and researched on the internet. I am using SQLite Expert Personal 3 with my RootsMagic 7 database and don’t find anywhere that I can use this version of SQLite to export results to a .csv or some file version that can be imported into Excel. Does anyone know if that is possible?
Thanks!
Mark
ve3meo
ve3meo
25 January 2016 04:14:14
You can copy from the results of a query to the clipboard and paste into Excel. To export to a file, I think you need the Pro version. Look up Export in Help – I don’t see this feature in the free version.
Tom
Tom
momakid
Can I get Alternate Name back into NameTable?
momakid
18 July 2017 03:40:56
I’ve searched the postings here and researched on the internet. I am using SQLite Spy with my RootsMagic 7 database and didn’t find anywhere how to accomplish what I need.
I am fairly new to RootsMagic.
Some action I did in the application causes a record to be added to the NameTable file with the IsPrimary filed is equal to 0. The IsPrimary equal to 0 causes the Alternate Name to be displayed on the Edit Person screen in the application. Alternate Name is displayed both in the left column with a plus and on the Edit Person screen.
I saw several Alternate Name lines on the Edit Person screen. I did not want all of the alternate names so I deleted all of the events with a fact type of Alternate Name in the application.
I still found Alternate names displayed in the left column and in the Edit Person screen. I found documentation that said Alternate names are in the NameTable with the IsPrimary = 0. I deleted them also.
Now I realize those were the married name and did not realize that when I deleted them.
I found a file that had the Alternate Names still in it and ran a query over it to get a list of the people in the NameTable file that have the IsPrimary = 0. I have put those records in a spreadsheet. I want to get those people back in the NameTable file.
Is there a query I can run to repopulate the NameTable file? Or is there a query that I can run that I can put the ownerid in to get the alternate names back into the NameTable?
ve3meo
ve3meo
19 July 2017 03:03:08
Did you see my response to your earlier posting on the home page?
Is it necessary to repopulate the NameTable from the spreadsheet or can the desired Alternate Names be filtered from the old database?
We might want to modify a group that we created using one of the parameterised scripts by adding or deleting persons that our programmed rules just can’t catch. For example, a Census Needed group might have someone in it who immigrated to the census jurisdiction after the census year or emigrated from it beforehand. Its rules are not complex enough to filter out these persons. So as we work through a group, we will find that there are persons we would like to remove from the group without getting all fancy about the rules. This page shows how we can go about building a script that we can run in tandem to ‘unmark’ or ‘mark’ selected persons for a group.
WARNING: you may use this type of refresh only on groups fully refreshed by an outboard SQLite query or on empty groups BUT NOT on groups last built or modified by using RM4’s Mark Group/Unmark Group functions as it is possible that the deletion of a person from the latter group may actually remove a range of persons with consecutive Record Numbers.
Group Unmark List
This script could be one of several similar ones with different lists of people. If we have a Census needed #1871 Canada group and a Census needed #1900 Pennsylvania group, the two sets of people to unmark will be very different. So we cannot use a single list with runtime parameters. We will need an Unmark script for each one. Each script will have a corresponding name and hardcoded parameters by which it will select and operate on the correct group. Let’s make an Unmark script for the group “*Census needed #1871 Canada” which we have previously built using the script at Census Needed – Named Group.
This first block of code clears out the temporary table GroupParmTable and re-creates it for the Unmark operation: NB- LabelID instead of LabelValue error corrected 2011-11-27 21:45 EST
DROPTABLEIFEXISTS GroupParmTable
;
CREATE TEMP TABLEIFNOTEXISTS GroupParmTable
ASSELECT LabelValue AS GroupID, LabelName COLLATE NOCASE FROM LabelTable
WHERE LabelName LIKE'%Census needed%#1871%Canada%'
;
This table stores the GroupID corresponding to the Group Name that matches the search string ‘%Census needed%#1871%Canada%’ for use by later statements in the script.
The next statement contains the list of RINs that are to be deleted from the group and deletes them.
-- Unmark (list of manual unmarks)DELETEFROM GroupTable
WHERE GroupID LIKE(SELECT GroupID FROM GroupParmTable
)AND StartID IN(78,829)-- list of RINs to unmark, separated by commas
;
-- END OF SCRIPT
And that’s all there is to it. As you find more persons you want to delete from the group, you just edit the list of RINs between the parentheses … (78,829,97,12345,2,678) No need to keep them sorted. Putting it altogether, here is my working script: Census needed #1871 Canada – group Unmark list.sql
Group Mark List
A similar procedure for refreshing the ‘manual’ marking of a group follows…
It starts with the same first block of code as Group Unmark above to ensure GroupParmTable registers the group to which we want to add people.
If the list is to replace all that is currently in the group, then we need to clean out the current members of the group with this block of code:
-- delete all persons from the named group whose id is stored in the temp table set up at the startDELETEFROM GroupTable WHERE GroupID =(SELECT GroupID FROM GroupParmTable
)
;
If, instead, the list is to be added to a non-empty group, skip the foregoing block. BUT, be warned that the following code does not prevent the duplication of existing persons in the group. That requires some extra measures TBA.
Now, we add the members in the list to the group:
-- Mark (list of manual marks)INSERTINTO GroupTable (GroupID, StartID, EndID)SELECT GroupID, MarkList.*, MarkList.*FROM GroupParmTable
LEFTJOIN(SELECT78-- RIN to be markedUNION-- required for each successive RIN to be markedSELECT829-- RIN to be marked--UNION -- uncomment for next RIN to be added)AS MarkList
;
That’s the end of the script. RINs 78 and 829 get added to the target group when the script is run against your database.
If the list got very large, it would be cumbersome to maintain and you can consider a couple of alternatives. One is to keep the list of RINs in a spreadsheet table and use formulas to produce the SELECT RINUNION statements, copy and paste into the script. You can also do it with a regular expression text editor such as PSPad ( Find: (d+) Replace: SELECT $1 UNION ). Another is to create a table of RINs either within your database or in a separate database and revise the procedure to SELECT DISTINCT RIN FROM databasename.tablename, replacing all the SELECT RIN UNION statements with this one.
Producing a list of names from your database similar to what is found by RootsMagic 4’s Search > Person List > NameFind, this query does it faster. Moreover, you can sort and filter the results, not supported in RootsMagic Explorer’s NameFind. As a list, it may prove handy to use in conjunction with RM Explorer’s “Record number to find” function (Alt-R).
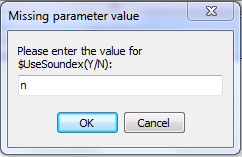
This query requires the use of SQLite Expert Personal or another SQLite manager that fully supports SQLite runtime parameters of the form $AA::AA(anytext). Neither SQLiteSpy nor SQLite Developer do.
On running the query, you will encounter a series of dialog windows prompting for inputs for:
UseSoundex(Y/N) – Y will use the Soundex function to look for soundalikes
Surname – the search string for surnames
Given – the search string for given names; left blank returns all surname matches
When Soundex is not invoked, you can also use wildcards in the name strings: _ for 1 character, % for any number of characters.
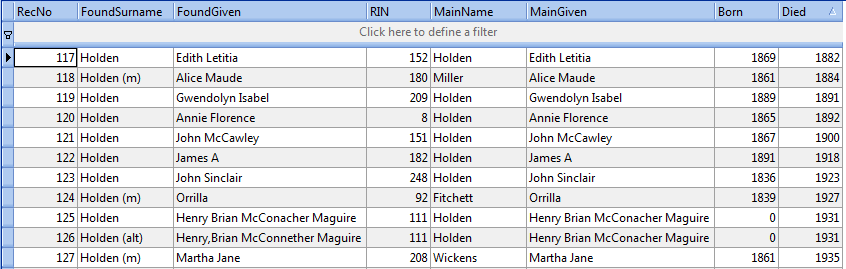
Sample result sorted on death year.
The query adds a suffix after the found surname if it is not the person’s primary name: (m) for married name (i.e., the name of the male spouse although that might not be accurate for all cases), (alt) for alternate name.
SQLite Expert Personal allows you to sort these results on any column (it re-runs the query adding an ORDER BY columnname clause). It also lets you filter simply entering a value in the cell of a column above the results or a more complex filter can be built using its Customise button. You can copy and paste selected results directly into Excel and Microsoft Word (use Convert text to table accepting its default settings).
Future
This is about the simplest result set that is useful. Of course, more RM4 tables could be tied in to extend the type of information that could be brought out.
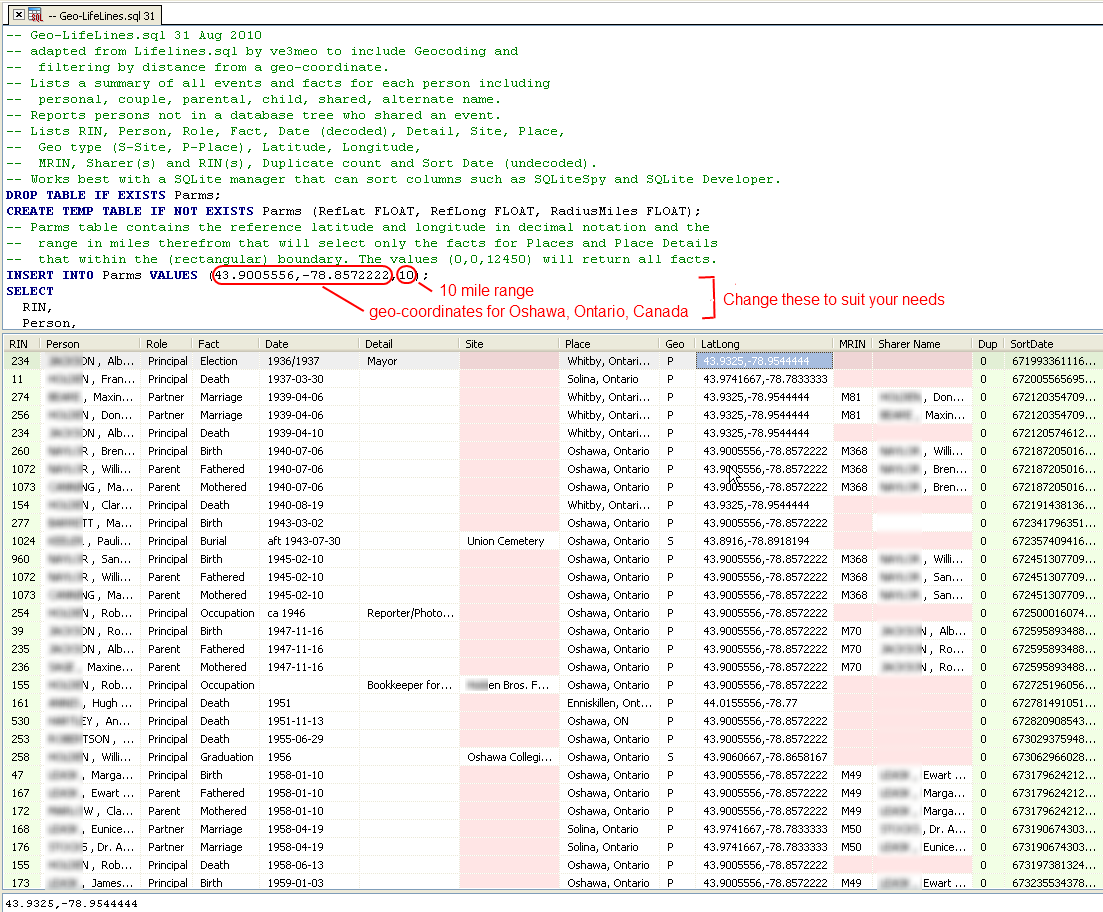
Have you ever wished to be able to look at all the facts in your family tree database that happened within a day’s horseride of a certain location? Until RootsMagic contains such a report, this adaptation of the LifeLines query helps you view your events for any geographic area in addition to looking at the lifeline of any person in your database.
Edit the SQL file to set the coordinates of your target location and the distance from it you want included. Set the values to (0,0,12450) to include all facts for everywhere. As coded near the end of the query, the results will be sorted by RIN and SortDate so that each person’s events are all together sorted by timeline. With SQLiteSpy et al, you can override that sort by clicking on a column header. Click on SortDate to mix people’s events in a pure timeline sort that may reveal some interesting connections.
Compare EXIF, IPTC, XMP metadata stored in image files to the Caption, Description and other metadata stored in a RootsMagic 5 database for image files linked to its Media Gallery and copy between the files and the database.
The principles and procedures outlined here, while based on the way Picasa uses metadata stored in image files, are applicable with appropriate modifications to relating other photo managers to RootsMagic 5.
Compare RM5 and Image File Metadata
Introduction
I use Picasa to manage my collection of photographs and other media and often write captions in Picasa’s picture editor for photos that I upload to Picasaweb online albums. Of course, working in RootsMagic, I get to write captions and descriptions for some of the same photos and for many others that I may not have captioned in Picasa. LessTX and others have asked that RM have some capability of using metadata fields stored in the image files as a way of loading values into RootsMagic or storing them in the image (e.g., Insert Image Metadata into Database and some of the results in this search of the RootsMagic Forums). This sounded attractive on the surface and so I have looked into it further.
Description
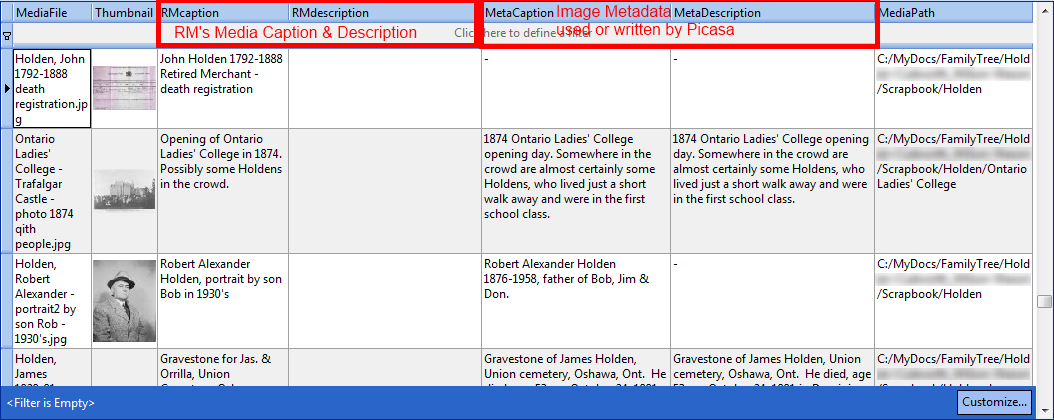
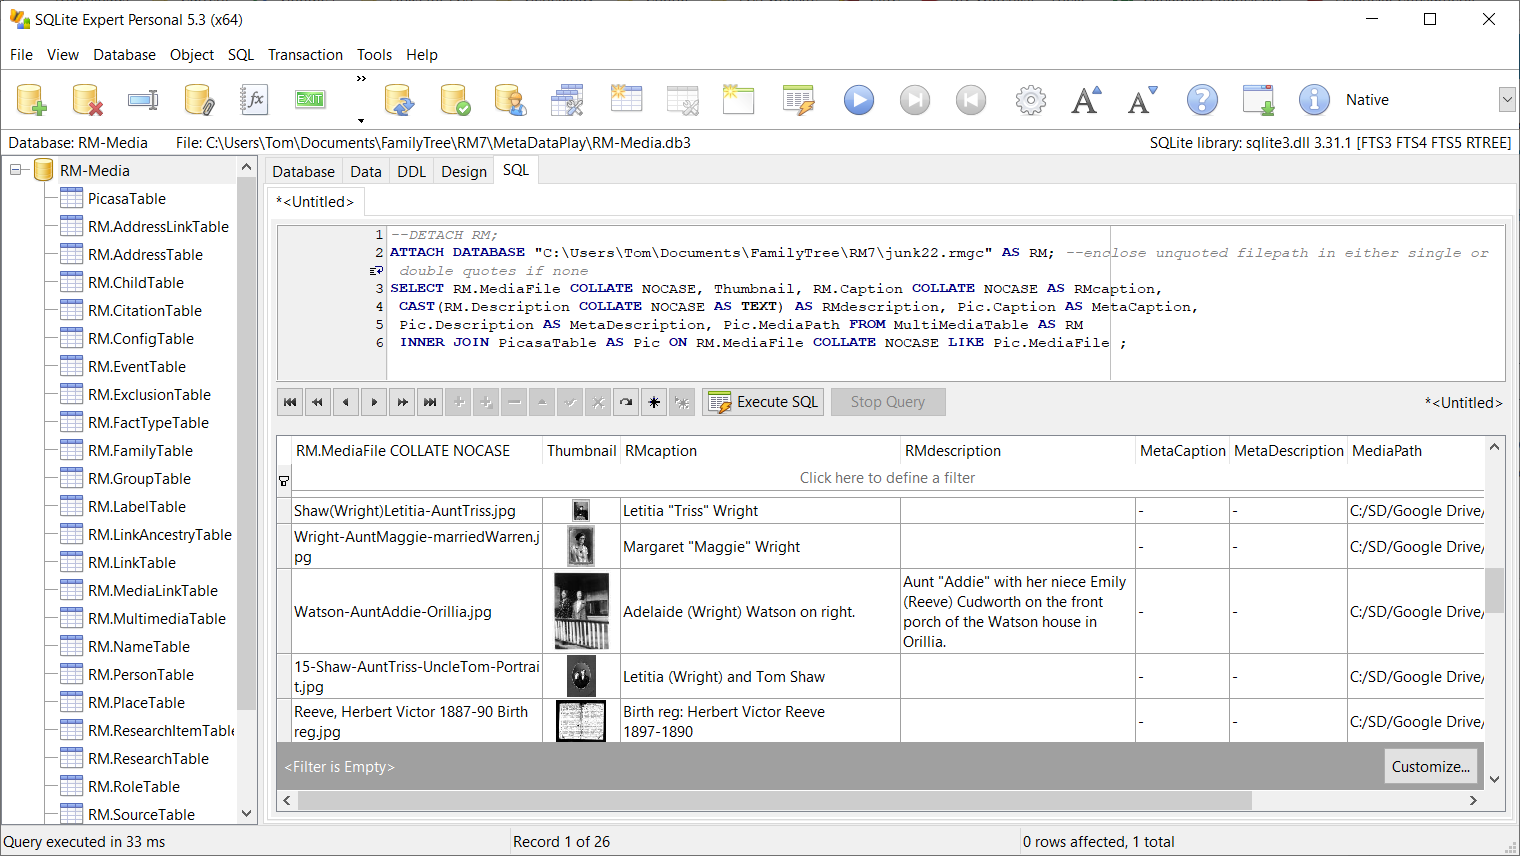
One result can be seen in this screenshot of a query in SQLite Expert Personal (which displays the thumbnail images, unlike most other SQLite managers):
Screenshot comparing RootsMagic media captions and descriptions to those stored by Picasa in the image file itself.
Under the left red box is the media caption and description metadata stored in the RootsMagic 5 database in the MultiMediaTable, along with the thumbnail image, image file name and path. Under the right hand box are the values extracted by ExifTool from the Caption-Abstract and Description metadata fields stored in the image file by Picasa. With this convenient comparison of the two sources of the image metadata, I can readily see discrepancies between the two and take any needed corrective action in the corresponding application.
Some Observations and Reservations re Automatic Synchronisation
I’ll describe how I developed this query after discussing some of my observations and reservations about automatically synchronizing the captions and descriptions between the RootsMagic database and the images.
Picasa ver 3.8.0 and RootsMagic 5.0.1.0
Picasa stores the same value in both the Caption-Abstract and Description tags in the image (but I cannot account for one example above of several that have a Caption-Abstract value but not Description – perhaps it was written by an earlier version). Therefore, there cannot be a 1:1 relationship between the RootsMagic metadata fields and the image’s metadata fields.
Neither RootsMagic nor Picasa have a low limit on the length of the string that can be stored in their respective places. However, the RootsMagic caption should be constrained to be quite short because so little space is provided for printing it in the one place it is used, a Scrapbook report. If the Description is also included in the Scrapbook, then both Caption and Description values must be severely limited. Picasa displays captions most generously in its slideshows, less so in the Photo Editor and to 16-60 characters under its variably zoomed thumbnails.
Given these significant differences, I cannot see a way of automatically copying from the metadata stored in the image file to the RM fields, without following up to edit them into appropriate sizes. The reverse may be more successful: concatenate the RootsMagic fields and copy the same value to both Caption-Abstract and Description tags in the image file.
That said, the use of the image file in a Picasa Album might dictate a quite different caption from that used in a RootsMagic Scrapbook report (just as some users were dismayed to discover that in upgrading from RM4 to RM5 they had lost the ability to have a different caption for the same image when associated with different persons, events, etc. – the usage dictates the caption).
Therefore, caption copying must be manually controlled, except for copying to blank fields which, nonetheless, is liable to require manual follow-up.
Although these observations are specific to RootsMagic 5-7.6 and Picasa, the RM constraints also apply in the general case and the conclusions may not be significantly altered, except for the possible maintenance of the separation between Caption and Description.
I have not explored whether there is any appropriate image metadata tags that may correspond with RM’s media Date and Reference Number.
Installation
Copy the windows command line shell sqlite3.exe from the sqlite-shell-win32-x86-3nnnnnn.zip file downloaded from the Precompiled Binaries for Windows section of sqlite.org to a folder of your choosing. The batch file below expects it to be in C:\Program Files (x86)\SQLite but that can be revised to suit.
Install exiftool.exe from ExifTool in a folder along with all of the related batch files and sql scripts. It could be located elsewhere if you revise the batch file accordingly.
Create a shortcut to the batch file RM5comparePicasa.bat with the Target property [“C:\yourpath\RM5comparePicasa.bat” “C:\yourpath\yourRMdatabase.rmgc”], enclosing the database path in double quotes. Name the shortcut something like “RMcomparePicasa yourdatabase“. Make such a shortcut for each database you want to review.
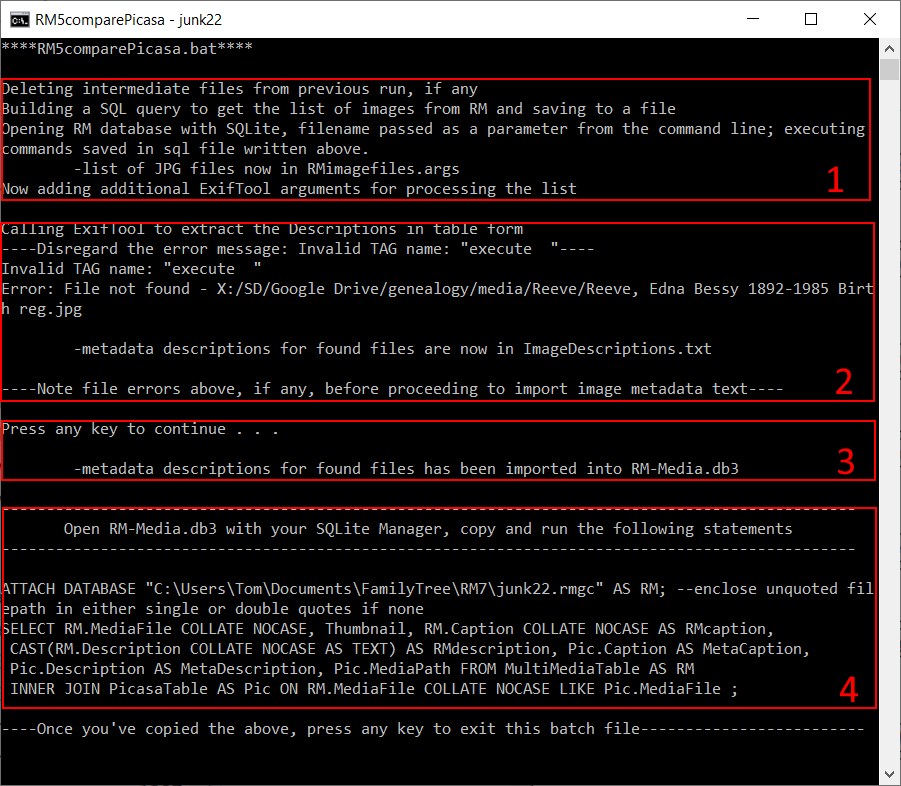
When you click on the shortcut, it launches the batch (or Windows command) file with the path to your database file passed to it in the %1 register. The batch file deletes the old files it created in a previous run and then proceeds to build a short sql script GetImageListFromRM.sql. Then it calls sqlite3 to open your database file and run the script which outputs the results of the query to the ExifTool arguments file RMimagefiles.args, to which it then appends the -execute argument. The args file contains the list of JPG files with full pathnames recorded in the RM5 database Media Gallery. [1]
Next the batch file calls ExifTool to go through the list of image files, find them if it can, and extract the values from the Caption-Abstract and Description tags along with the paths and file names to a new file, ImageDescriptions.txt. There’s a pause to review any possible error reports in the command window, e.g., file not found. [2]
Now the batch file calls sqlite3 again to open or create the local database RM-Media.db3, creates PicasaTable with four columns matching those in the tab-delimited ImageDescription.txt and imports the latter into the table. [3]
That’s it for the batch file, except to generate instructions as to what to do next: Open RM-Media.db3 with your SQLite manager (SQLite Expert Personal if you want to see the thumbnails), copy and run some SQLite statements the batch generated. [4]
If everything worked as intended, you should see results like this screenshot (adjust column widths to suit, of course).
[Inline comment: ve3meo Jan 22, 2012
There is a flaw in the above to be corrected if there are multiple image files with the same file name in different paths. It has been correctly done in the RM5copyMetaDataToRM query.]
Copy RM Image Metadata to Image File (Picasa compatible)
Description
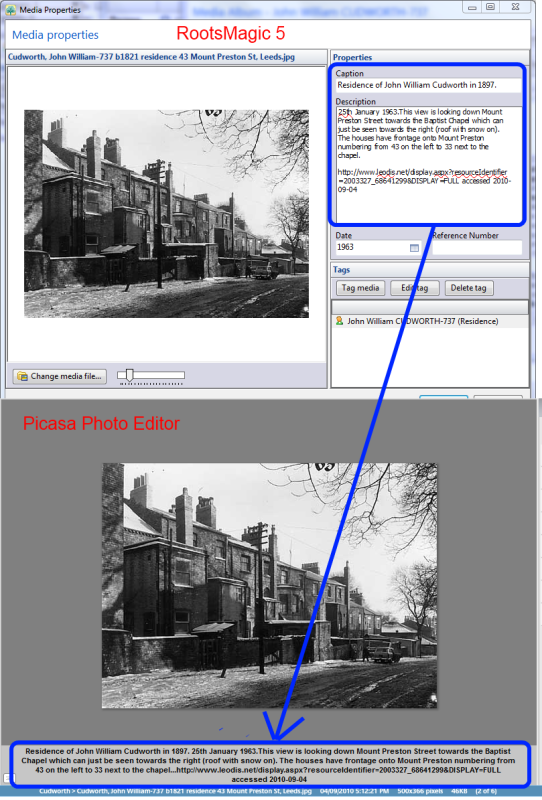
The batch, SQLite, ExifTool procedure copied the RM5 caption and description to the Caption-Abstract metadata tag in the image file, the result of which is seen as a caption in the Picasa Photo Editor.
This is basically a query in RM-Media.db3 (created and updated by the Compare utility with the RM5 database attached) to extract the list of files for which RM has a caption and the image file does not, along with the concatenation of caption and description values, and getting those into a file in the format required for ExifTool arguments with the appropriate arguments to tell ExifTool to write the value into the Caption-Abstract tag of the image files, and then run ExifTool against the args file. All this is managed by a batch file as was done for the Compare procedure. Here is an example showing how the RM5 Caption + Description end up being displayed as a Picasa caption.
This was a very tricky procedure to finally get going and resulted in considerable hair loss! The arguments for ExifTool must be one per line so carriage return/line feed controls (CR/LF) in the RM5 values must be replaced. Thus the white space above the URL in the RM Description disappears in the Picasa caption, the CR/LFs being replaced by periods.
This same difference applies in using ExifTool to copy the metadata from the image to RM: ExifTool itself substitutes a period for CR/LF embedded in the metadata values. Thus metadata values on either side containing CR/LF cannot be exactly replicated on the other, at least with ExifTool as the intermediary.
Installation
sqlite3.exe and exiftool.exe are already installed as above
[Inline comment: ve3meo Jan 22, 2012 There is a flaw in the above to be corrected if there are multiple image files with the same file name in different paths. It has been correctly done in the RM5copyMetaDataToRM query.]
/* RM5copyMetadataToImageFileExifToolArgList.sql
*/SELECT'-Caption-Abstract='||REPLACE(CAST(RM.Caption AS TEXT),x'0D0A','.')||' '||REPLACE(CAST(RM.Description AS TEXT),x'0D0A','.')||CAST(X'0D0A'AS TEXT)||
RM.MediaPath
||
RM.MediaFile
||CAST(X'0D0A'AS TEXT)||'-execute'|| Pic.ROWID
||CAST(X'0D0A'AS TEXT)AS Args
FROM MultiMediaTable AS RM
INNERJOIN PicasaTable AS Pic
ON RM.MediaFile COLLATE NOCASE = Pic.MediaFile
WHERE(RM.Caption ISNOTNULLOR RM.Description ISNOTNULL)AND(Pic.Caption LIKE'-'AND Pic.Description LIKE'-')
;
Create a shortcut to the batch file RM5copyMetadataToImageFile.bat with the Target property [“C:\yourpath\RM5copyMetadataToImageFile.bat” “C:\yourpath\yourRM5database.rmgc”] and name it something like “RM5copyMetadataToImageFile – yourdatabase“. Make such a shortcut for each database you want to copy captions from.
ECHO OFF
REM RM5copyMetadataToImageFile.bat
REM
REM Build sql file
ECHO ATTACH DATABASE '%~1' AS RM ; > RM5copyMetaData.sql
TYPE RM5copyMetadataToImageFileExifToolArgList.sql >> RM5copyMetaData.sql
"C:\Program Files (x86)\SQLite\sqlite3.exe" RM-Media.db3 < RM5copyMetaData.sql > RM5copyMetaDataToImageFile.args
ECHO .
ECHO Check RM5copyMetaDataToImageFile.args before proceeding to write to the image files
PAUSE
exiftool -@ RM5copyMetaDataToImageFile.args > RM5copyMetaDataToImageFile.log
ECHO .
ECHO Finished copying captions to image files
PAUSE
END
Procedure
First run the Compare utility against your database to ensure that the RM-Media.db3 is up-to-date with the current metadata from all of the images used by the database. Then click on the shortcut “RM5copyMetadataToImageFile – yourdatabase“. The Windows Command console will open and, almost immediately, you will asked to
Check RM5copyMetaDataToImageFile.args before proceeding to write to the image files
Open the file (in the folder common to all of the .bat and .sql files you have installed as instructed above) with a non-wrapping text editor and note that each file is addressed by a triplet of three lines and an empty line after as:
-Caption-Abstract=Obituary - Colin xxx North Bay Nugget - Aug 13, 1956
C:MyDocsFamilyTreeHolxxxScrapbookxxxxxxn, Colin - obituary - 1956.jpg
-execute2

 -Caption-Abstract=Registration of birth of Helen xxx 13
 C:MyDocsFamilyTreeHolxxxScrapbookxxxxxxth, Helen Elizabeth - Birth Register xxx13.jpg
 -execute3
 ...
There should be nothing else in this args file than the triplets of single lines as above. The number following -execute is the PicasaTable rowid, which may be useful in tracking down a problem if ExifTool encounters a bad image file (I think it will report that number in its error message).
Then, press any key to launch ExifTool to work on the list of files. ExifTool copies each file to a .jpg_original file and re-writes the .jpg file with the new Caption-Abstract value added.
After some time, proportional to the number of files being processed, you will see the message “Finished … Press any key to continue.” Because the batch file is really basic with no error-trapping, you will see this message regardless of errors. It’s possible that no file may have been processed. Inspect the file RM5copyMetaDataToImageFile.log for any error message.
Assuming no errors, if Picasa is set to monitor the folders where these image files are located and was running at the time they were being revised by ExifTool, you will have seen the little pop-up message from Picasa as it updates its thumbnails and its internal storage of captions for searching. The ability to search through captions is one of Picasa’s strong features, along with its facial recognition and multiple views: Albums, People, Folders.
Copy Image Metadata from JPG to RM
This procedure is trivial compared to the opposite direction. The heavy work has been done in the Compare… procedure, which should be carried out before attempting to copy metadata to the RootsMagic database as the Copy… relies on the RM-Media.db3 database created and updated by Compare… The only operation that makes sense to me that would benefit from such a procedure is to copy multiple image files’ Caption-Abstract values to empty RootsMagic captions for those files. Copying onto existing captions is necessarily a manual process and could be done with copy/paste between the applications.
This is essentially a SQL query against both the RootsMagic database and the RM-Media.db3 database. However, it’s complicated by the fact that I cannot figure out a way to make a single UPDATE statement work for multiple captions so a batch procedure is needed to generate a sql script file with multiple UPDATE statements, one per caption to be copied, and run that.
-- RM5copyMetadataToRM.sql-- generates an UPDATE statement for each blank caption in RM for which there is a caption extracted from the image file-- requires RM-Media.db3 with the RM5 database ATTACHedSELECT'UPDATE MultiMediaTable SET Caption=(SELECT Caption FROM PicasaTable WHERE ROWID='|| PicID ||') WHERE MediaID='|| MediaID ||';'AS Statement
FROM(SELECT MediaID, Pic.ROWID AS PicID
FROM MultiMediaTable AS RM
INNERJOIN PicasaTable AS Pic
ONREPLACE(RM.MediaPath || RM.MediaFile,'', '/')
LIKE Pic.MediaPath || '/' || Pic.MediaFile
WHERE Pic.Caption NOT LIKE '-' AND RM.Caption IS NULL
)
;
RM5copyMetadataToRM.bat.bak Download to the common folder: (Remove .bak extension added due some systems’ security)
ECHO OFF
REM RM5copyMetadataToRM.bat
REM Copies to blank RM5 captions the values from Caption-Abstract metadata stored
REM in the corresponding image files
REM Uses PicasaTable in RM-Media.db3 created by the related Compare routine
REM and the MultiMediaTable of the target RootsMagic 5 database.
REM Requires the sqlite3.exe command line shell
REM
REM Build and run sql script file that generates UPDATE statements for each caption to be copied
ECHO ATTACH DATABASE '%~1' AS RM ; > RM5copyMetaData.sql
TYPE RM5copyMetadataToRM.sql >> RM5copyMetaData.sql
"C:\Program Files (x86)\SQLite\sqlite3.exe" RM-Media.db3 < RM5copyMetaData.sql > RM5UpdateCaptions.sql
REM
REM Build and run the sql script file that UPDATEs the target RootsMagic 5 database captions
ECHO ATTACH DATABASE '%~1' AS RM ; > RM5copyMetaData.sql
TYPE RM5UpdateCaptions.sql >> RM5copyMetaData.sql
ECHO Check RM5copyMetaData.sql before running the caption UPDATEs
PAUSE
"C:\Program Files (x86)\SQLite\sqlite3.exe" RM-Media.db3 < RM5copyMetaData.sql
ECHO Blank RM5 Captions Updated
PAUSE
END
Create a shortcut to the batch file RM5copyMetadataToRM.bat with the Target property [“C:\yourpath\RM5copyMetadataToRM.bat” “C:\yourpath\yourRM5database.rmgc”] and name it something like “RM5copyMetadataToRM – yourdatabase“. Make such a shortcut for each database to which you want to copy captions.
Procedure
First run the Compare utility against your database to ensure that the RM-Media.db3 is up-to-date with the current metadata from all of the images used by the database. Then click on the shortcut “RM5copyMetadataToRM – yourdatabase“. Follow the on-screen instructions. Use RootsMagic to check the new captions.
Further Considerations
The two unidirectional copy caption to blank caption procedures could be combined into one batch and made to standalone without the need for the Compare… procedure to be run in advance.
A comparison between RM’s Caption + Description and the image file’s Caption-Abstract by substituting the CR/LF’s in the former with periods might be feasible.
If MetaData comparisons and copying/editing were part of a future RM feature or outboard utility, it would be desirable to have a directional choice per image where there are non-blank values in both.
What relationship should there be between RM’s Date and Reference Number fields and any EXIF, IPTC, or XMP tag?
What changes may be needed for compatibility with media managers other than Picasa?
There is a flaw in the above to be corrected if there are multiple image files with the same file name in different paths. It has been correctly done in the RM5copyMetaDataToRM query.
I’m going to write this up as a free standing utility program that performs only one function. But of course I would prefer that it be included in a bundled and comprehensive utility program. The proposal is for a Named Group and Color Coding Manager for RM5. This intent is to supplement the Named Group and Color Coding capabilities that are already in RM5. For example,
It is possible to create a Named Group from a collection of individuals that are color coded. But it is not possible to create a color coding scheme from Named Groups.
The criteria used to create a Named Group or to color code a collection of individuals does not apply to any persons or facts or changes made to the database after the criteria are applied.
It is not possible to save the criteria that were used to establish a color coding or to save the criteria used to create a Named Group and later to reapply those criteria.
It is not possible to document the purpose of a Named Group or of a color coding with a comment that is associated with the Named Group or color coding.
It is not possible to establish a default color coding scheme for a database, to temporarily change some of the color coding in the database, and then automatically to reset the color coding back to the default.
There are not timestamps maintained about a Named Group or a color coding to indicate when they were established or when they were last reapplied.
It is not possible for the criteria used to define a Named Group or a color coding to include complete Boolean logic (AND, OR, NOT, and parentheses).
It is not possible for the criteria used to define a Named Group or a color coding to apply two or more tests to the same fact. For example, the test “census date equal 1850” and the test “census place contains Tennessee” are not guaranteed to be applied to the same census fact.
There are a number of criteria that would be useful to include in the definition of a Named Group or in the creation of a color coding that are not supported by RM5. Examples are that it is not possible from within RM5 to search for number of parents or number of children, and there are a number of source and citation fields that cannot be searched.
The intent will be to address all these issues.
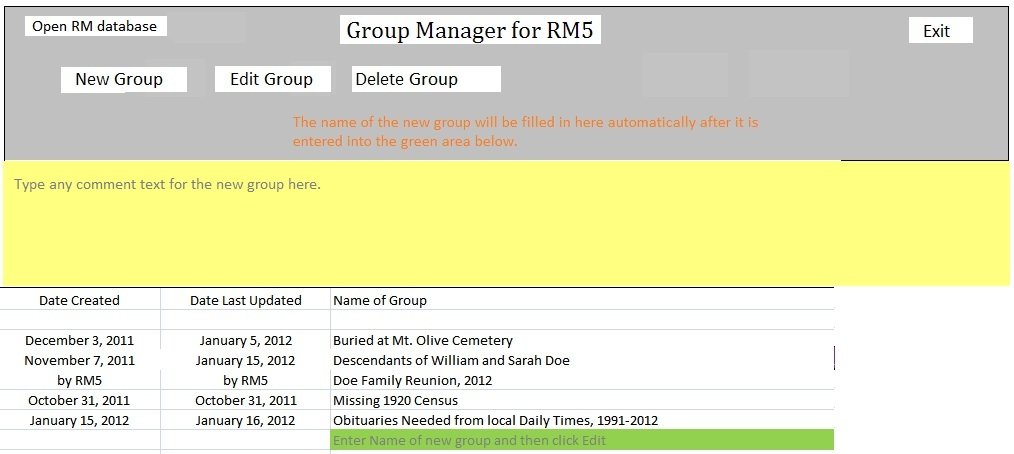
Here follows a mockup of a proposed “main screen” for the utility program. The mockup assumes that an RM5 database has been opened and that the database already includes a number of named groups.
Note that one of the groups was created from within RM5 itself. Such groups will not include additional metadata needed by the proposed Group Manager.
The proposed Group Manager will need two additional tables in the RM5 database. A table called the GroupDefTable would contain the following data elements.
GroupDefID – a numeric primary key that has no other purpose than to be a unique primary key.
OwnerID – a unique foreign key that can be joined to RM5’s own GroupTable and LabelTable.
CreationDate – the date the Named Group was created.
EditedDate – the date the Named Group was lasted edited.
Comment – Descriptive text for the group (the area in yellow).
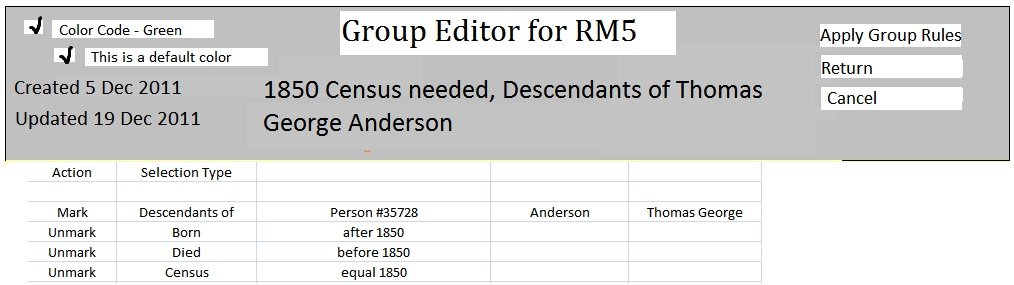
Color – the color code to be applied to all the members of the group (if any). This data element is on the Edit Group screen below.
ColorDefaultFlag – a flag to indicate whether this group and its color is a part of the default color scheme for this database. This data element is on the Edit Group screen below.
In order to edit the group criteria for an existing group, the user would double click one of the groups in the list, or would single click or scroll to one of the groups in the list and click the Edit Group button at the top of the screen.
In order to delete the group criteria for an existing group and to delete the group, the user would single click or scroll to one of the groups in the list and click the Delete Group button at the top of the screen.
In order to create a new group, the user would click the New Group button at the top of the screen, and the screen would look something like the following.
After entering the data for the new group, click Edit Group to bring up the Edit Group screen where the group criteria are entered.
This screen and the underlying GroupCriteriaTable are not fully formed in my mind just yet. Because this note is becoming so long, I’ll return to it later and fill in more details of how this screen would work for entering the group criteria and how the underlying table will work. I’ll also follow up with some more details of how the group definition process would interact with color coding.
Jerry
Discussions & comments from Wikispaces site
ve3meo
Great!
ve3meo
22 January 2012 13:47:42
What a great surprise this morning, Jerry! Your proposal and detailed outline sound very thorough and useful. I think Named Groups is long overdue for enhancement and your tool will be most welcome by many. I look forward to your further description and progress and would be happy to assist in any way I can.
Are you developing in Visual C++?
Tom
snowathlete
snowathlete
24 October 2012 12:42:33
i also think this looks like an excellent idea. i would definately use this. does it have an ETA?
ve3meo
Manual Mark/Unmark
ve3meo
23 January 2012 23:02:21
I wonder if you have given thought to building and maintaining a list of individual Mark/Unmark settings in addition to the algebraic rules. Your Group Editor might be an adequate user interface with one row taken for each person. Alternatively, I could envision a Mark > Persons or Unmark > Persons opening up another dialog window with the list of persons in the database (as in RM Explorer) with checkboxes – maybe a common list with two mutually exclusive checkboxes each, one for Mark, one for Unmark (or maybe the proper term is Exclude). At its simplest, the dialog interface could just be a list of RINs that the user copies from RM.
I showed a very crude Mark/Unmark of individuals in
This may warrant another table with three fields, GroupID, PersonID and Mark or perhaps a 4th, Unmark. Three would be adequate but the 4th might be easier to work with.
thejerrybryan
thejerrybryan
24 January 2012 05:22:16
Yes, I envisioned a mark/unmark capability on an person by person basis. I don’t think an additional table would be required. But whether an additional table would be required or not, the trickier part would be the user interface. As you suggest, the two basic options for the user interface would be to have row after row of “mark/unmark individual nnnnn” (i.e., by RIN number), or to have a RM Explorer style of marking capability
I’m trying to stay away from what I think is RM’s excessive clickiness. So for example, to enter comments about a group, a note window would not open up. Rather, the user would type directly into what I’m describing as the “yellow area”. I would like to do the same for mark/unmark on a person by person basis, but it may be necessary to do it RM Explorer style.
I have recently added a new drive to my pc and wanted a quick way to update the media path file. Whilst there is standard tool within RM5 to fix broken media links, it searches through my entire pc which now has 5TB of data – it picks up files from backup directories and generally takes a long time. I also have the option to update the path directly in the MultimediaTable. Some examples below:
I want to review the records with a particular path
SELECT * FROM MultimediaTable
  WHERE Mediapath like ('J:\FAMILY_HISTORY\PAXTON\CERT%');
I want to update this path to the new path
UPDATE multimediatable
  SET Mediapath = 'S:\New_Family_History\PAXTON\CERT')
WHERE mediapath LIKE ('J:\FAMILY_HISTORY\PAXTON\CERT%');
If i want to replace only some of the path and not the entire string i use the REPLACE function
UPDATE multimediatable
 SET Mediapath = REPLACE (Mediapath, 'J:\FAMILY_HISTORY', 'S:\New_Family_History')
WHERE mediapath LIKE ('J:\FAMILY_HISTORY\PAXTON\CERT%');
Cheers,
Sean
Discussions & comments from Wikispaces site
ve3meo
Inline comment: “a quick way to update the media path file”
ve3meo
04 September 2018 03:34:47
ve3meo Jan 12, 2012
Good examples of Search, Update and Replace. Also see the page Search & Replace for more examples. Of course, RootsMagic own Search & Replace function on “Multimedia filenames” in the “Field to search” selection does much the same, with the ability to confirm each replace.
One report that would be a great boon to RM users is one that would look at the recored information for each individual and work out where Census entries were missing. Of course this would vary by country of user but I am approaching this from the point of view of a UK User where 95% or more of his people records are for UK family.
For example we can assume at the moment that potential Census records exist for viewing for every tenth year between 1841 and 1911. The logic require is, therefore, to look at the birth/baptism/christening and death/burial dates of the individual as well as the existing Census entries on the Rootsmagic database and determine which Census entires are likley to be missing. We would also need some logic to cope as well as it could with individuals for whom no birth or death dates are known. The following “selections” would pull together what I want:
a) Individual has Birth Date earlier than 2nd April 1911 and Death Date no earlier than Sunday 6th June 1841:
Look through the Census entries on RM and if any are missing over the period the person was living between 1841 and 1911 then highlight this fact.
b) Individual has Birth Date earlier than 2nd Paril 1911 but no recorded Death Date:
In the absence of any other data – proceed as for a) above from date of Birth to 1911.
c) Individual has no Brith Date and a Death Date recorded after 1841:
In the absence of any other data proceed as a) above from 1841 to date of death.
d) Individual has no birth date and no death date:
Clearly we do not want to report on the many people who were “obviously” born after 1911 or “obviously” dead before 1841. One solution might be to look at Parents or Children of these individuals and try and determin whether they should be included in the report. Or perhaps just an option to include everyone in this category or exclude everyone in this category. Or to see if there are any Events of any type recorded for the individual between the period 1841 and 1911.
Or perhaps others have a better idea?
In a) b) c) and d) above I think the code should determine a birth date from the presence of either a Birth entry or in its absence a Baptism entry or a Christening entry. Similarly the Death entry should be used or in its absence a Burial entry.
I would envisage the report looking something like:
Name of Individual Birth/Chr/Bapt Death/Burial Potential Missing Census References
xx xxxxxxxxxxx xx/xx/1837 xx/xx/1902 1851, 1861, 1881
xx xxxxxxxxxxx xx/xx/1794 xx/xx/1852 1841, 1851
xx xxxxxxxxxxx xx/xx/1878 N/K 1901, 1911
Clearly for RM Users in other countries, where a different ranges of Census data isavailable, the start and end year parameters would have to be different.
MVS.
Discussions & comments from Wikispaces site
ve3meo
Inline comment: “where Census entries were missing”
ve3meo
04 September 2018 01:48:57
ve3meo Jan 16, 2012
In some respects,
Census Needed – Named Group does what you want. The qualifying rules are simpler but may be enhanced. Once the group is created, you could generate reports restricted to it, or, just select the group and work through it. Periodically, re-run the query to refresh the group membership and take satisfaction from seeing it shrink!
Inline comments
ve3meo
Comment: In some respects,
Census Needed – Na…
ve3meo
16 January 2012 18:21:38
In some respects, Census Needed – Named Group does what you want. The qualifying rules are simpler but may be enhanced. Once the group is created, you could generate reports restricted to it, or, just select the group and work through it. Periodically, re-run the query to refresh the group membership and take satisfaction from seeing it shrink!
OK, this is a little misleading as it will only work for images (i.e. not applicable for text files or pdf files) ~ if anyone can show me how to check for valid paths from sqlite, i would be stoked!
SELECT *
FROM Multimediatable
WHERE Thumbnail is null
AND Mediafile like '%.jpg';
Discussions & comments from Wikispaces site
ve3meo
Comment: “how to check for valid paths from sqlite”
ve3meo
03 September 2018 21:49:34
ve3meo Jan 15, 2012
I have done this indirectly, by exporting the full path of each file to a text file to be processed by a command file (.bat or .cmd): see
Backup Media with Database – 7Zip
Backup Media with Database – RAR
Also, I have copied the results of a query to Excel and created hyperlinks (either in the query itself or by formula in Excel): see
Media List Query.
It requires more than SQLite itself to test that the stored path leads to the target file.
At the very least, your query lists those image files that have not been opened by RM, hence nothing in the thumbnail field.
RootsMagic 5 and below support for Ahnentafel numbering is limited to 32 bits, or 32 generations, even though the report allows the user to select a larger number. If the report does run over 32 generations, the Ahnentafel number starts over and is therefore incorrect. This query demonstrates that SQLite itself can support a 64 generation Ahnentafel report.
The results of this query look very similar to those from the Ancestors Query, with the addition of both a binary and decimal Ahnentafel number for the last person in a direct ancestral line from the starting person, expanded to 64 generations. It is a very large and slow query that cries out for help from a high level language because SQLite itself does not support loops nor binary-decimal conversion. If your database is large, I strongly recommend using a SQLite manager that supports run-time parameters so that the results are limited to the ancestry of just one person (SQLite Expert Personal or SQLite Developer), not that it is faster but rather the processing or results may exceed the software’s capacity to manage memory.
To build and revise it many times, I used Excel to generate the 64 lines from each of around 8 formulas, sorting and unsorting a large block of interleaved phrases for each revision. As such, the query is not very readable, having many very long lines and lacking indentation.
There must be a more efficient way of coming up with the lineage than the two similar methods I have used in this and its parental query (despite the similarity in the appearance of the results, Ahnentafel-64 uses a significantly different relationship in building the lineage). It is simply too slow to be attractive to run on databases larger than a few thousand persons. So there’s a challenge! Come up with a better one!
— the Excel spreadsheet on which the query was developed using formulae.
Having torn my hair out trying to reconcile differences between RootsMagic 5’s Ahnentafel list and the results I was getting with my query, I discovered that RM5’s follows the parental line selected in the Pedigree View. I had one person shown with her adoptive parents and compounded with other issues I was having with incorrect Ahnentafel calculations, missing the last parent, etc., it took me quite a while to understand that some longer lines I was getting that were not showing up in the RM5 report were not because of an error in my query but because of this undocumented behaviour in RM5! My query follows the Birth parental line only; RM5 appears to follow whichever set of parents you choose.

 a shortcut to the batch file RM5copyMetadataToImageFile.bat with the Target property [“C:\yourpath\RM5copyMetadataToImageFile.bat” “C:\yourpath\yourRM5database.rmgc”] and name it something like “RM5copyMetadataToImageFile – yourdatabase“. Make such a shortcut for each database you want to copy captions from.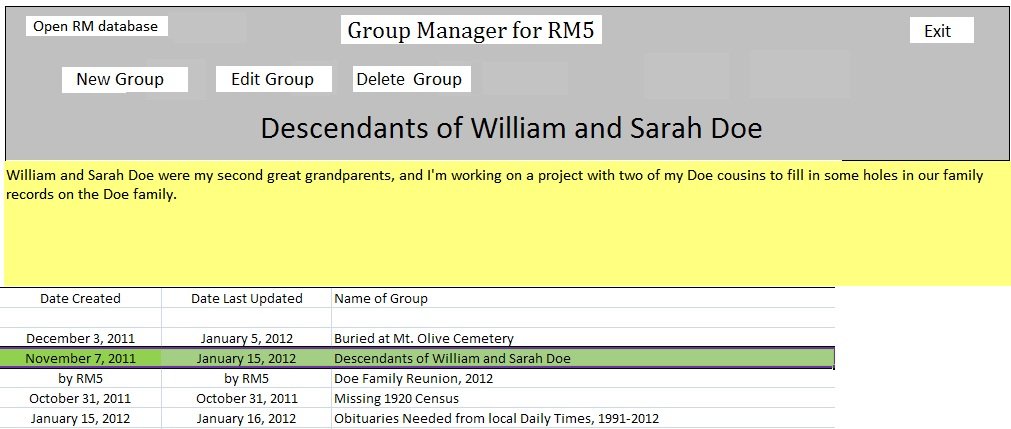
ve3meo